Assuming that you already have a MantraJS or a MeteorJS project and you are wondering how to make your project available online because you are tired of running it on localhost. Well today, I will show you the step by step guild on how to deploy your Meteor or Mantra JS application to Heroku.
Why Heroku?
There are 2 reasons why:
1. They have a free plan that is good enough for testing or starter projects.
2. They have an easy to use interface.
So let's get on with it. Since we will be using GitHub as our CI (Continuous Integration), it is important that you push your project to GitHub, here is the guide on how to do it.
Creating a GitHub Repository
1. Login to your GitHub account or sign up if you do not have an account yet.
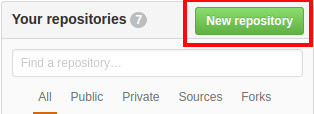
2. Create a new GitHub Repository by clicking the button "New Repository" on the right hand side of your GitHub dashboard.
 |
| Creating Repository 1.1 |
3. Fill out the Create New Repository Form
4. You can use either public or private option; however, the private option has payment.
5. Make sure the "Initialize this repository with a README" is UNCHECKED so that the repository will not be initialized or created automatically.
 |
| Creating Repository 1.2: Step 3, 4 and 5 |
6. Then click the button "Create Repository".
7. You will be given a guide on how to add the created GitHub repository to your project. (DO NOT CLOSE THE WINDOW YET)

Uploading Project to GitHub
1. Open your terminal or CMD if you are using Windows Operating system.
2. Go to the folder or directory where your project is located via terminal or CMD.
3. Once you are inside the project folder, go back to your web browser and open the guide on how to create GitHub repository to your project. Follow the steps highlighted on the screenshot below.
 |
| Creating Repository 1.3 |
NOTE: If you are using MantraJS or any project that has or uses NODE MODULES, you need to create a ".gitignore" file inside your project folder and inside the file just put "node_modules" (without double quotes). This will make the push or upload faster.
- echo "# SampleProject" >> README.md - This will create a file named README.md inside your project folder.
- git init - this will create a folder ".git" where your GitHub configuration is being set up.
- git add README.md - You are notifying GitHub that you made changes to your git repository by adding a README.md file. However, since we will be adding our whole project files to git, you have to use "git add --all" instead of "git add README.md".
- git commit -m 'first commit" - You are saving those changes you added. You can change the string "first commit" to any message you want (of course it has to be related to changes you made).
- git remote add origin https://github.com/neilakoh/SampleProject.git - you are adding and connecting your remote git repository to your local git repository.
- git push -u origin master - You are now uploading your files to your remote git repository (GitHub).
You will be asked to enter a username and password, just enter your GitHub username and password and it should go through.
Deploying your project from GitHub to Heroku
1. Login to your Heroku account2. Click the button "Create New App" / "Create App".
3. Enter the name of your app (I named it "aboutonline") and select a runtime region (choose United States if you are outside Europe).
4. Click the button "Create App". You will be redirected to the "Deploy" page.
5. Under the "Deployment method" section click the option "GitHub". See screenshot below.
 |
| Selecting the GitHub CI |
6. Under the section "Connect to GitHub", just search the repository of your application. In this guide I created the repository with the name "SampleProject".
 |
| Searching the GitHub Application Repository |
7. Click the button "Connect" on the right hand side of the search result if your app is successfully located.
 |
| Search Result if the repository is successfully located |
8. Click the "Settings" at the top menu.
9. Under the section "Config Variables" click the button "Reveal Config Vars". This is where you add the ROOT_URL and the MONGO_URL of your application.
 |
| Location for MongoURL and RootURL configuration |
10. On the first box enter "ROOT_URL" or "MONGO_URL" and on the second box enter the value of your"ROOT_URL" or "MONGO_URL" and then click the "Add" button. See image below.
 |
| Connecting your application to your domain name or web address and database |
NOTE: Your domain name or web address is located at the bottom under the section "Domains"
11. Below, under the section "Buildpacks" click the button "Add Buildpack"
 |
| Adding buildpack necessary to run your application on the web |
12. A pop-up box will show up, just add the line below and click "Save changes":
https://github.com/AdmitHub/meteor-buildpack-horse.git
 |
| Adding the buildpack URL |
13. After adding the buildpack, go back to Deploy page.
14. Click the check box "Wait for CI to pass before deploy".
15. Click the button "Enable Automatic Deploys".
16. Click the button "Deploy Branch".
 |
| Final Stage in deployment process. Step 14 to 16 |
This will build the application from your GitHub repository and point it to your ROOT_URL (web address) and MONGO_URL (database). Once it is done deploying your application you should be able to see your website when you access your domain name.
 |
| Finish result |
Please comment below if you have questions, thanks.